Provisioning DNS Server Using PowerDNS
When you want to setup a DNS server on *nix platform, the first option that may cross your mind is bind9. But there are other options such as PowerDNS. In this post I’m going to show you how to setup a DNS server in single node mode. This DNS server is going to be authoritative and forwarder (in case of PowerDNS, recursor mode). Database is going to be mysql and for managing it I’m going to use powerdns-admin using Docker, and all of these, going to be installed on a single node with Ubuntu 18 lts and PowerDNS 4.1.1. This solution is suitable for small to medium sized companies although in this scenario I don’t config a secondary DNS server.
A little bit of theory first, DNS servers have two modes. Authoritative and forwarder. In authoritative mode when a client asks for a domain name the DNS server is responsible to give the IP address, in other words, authoritative DNS servers are the one which own the IP/Domain database.
DNS forwarder task is to redirect requests to other authoritative DNS servers.
In this scenario we want to setup a DNS server for a company to answer local DNS requests as well as redirect external requests to other DNS servers.
First of all update your packages :
sudo apt -y update && sudo apt -y upgradeSince Ubuntu 18+ comes with a new DNS resolver, this daemon uses udp port 53. Which is going to be used by PowerDNS instead, so we have to stop and disable this service using :
sudo systemctl stop systemd-resolved
sudo systemctl disable systemd-resolved
After removing this daemon you’ll not have local DNS forward, for resolving this issue edit the /etc/resol.conf and add following line :
nameserver 8.8.8.8 # you need to set a DNS serverThen we have to prepare Mysql backend :
sudo apt install mysql-serverAfter installing Mysql if you interested you can make it more secure using following :
sudo mysql_secure_installationThis command will take you to series of questions, such as root password for Mysql or disabling anonymous user. In my case I will config Mysql root password with mysql_native_password mode in order to access Mysql database using password.
Configuring mysql_native_password :
sudo mysql

> ALTER USER 'root'@'localhost' IDENTIFIED WITH mysql_native_password BY 'PASSWORD';

> FLUSH PRIVILEGES;

> exit;
Note : Make sure your server’s date/time is correct. It might not seem important in this case, but it is a best practice to sync date/time
Installing PowerDNS :
sudo apt install pdns-server pdns-backend-mysqlIn contrast to older version of PowerDNS, in 4.1.1 version you don’t need to do anything further since the installer will take care of configuring mysql and other configs. In order to make sure everything is working correctly you can check PowerDNS’s mysql setting with :
cat /etc/powerdns/pdns.d/pdns.local.gmysql.confYou ought to see following:
# MySQL Configuration
#
# Launch gmysql backend
launch+=gmysql

# gmysql parameters
gmysql-host=localhost
gmysql-port=3306
gmysql-dbname=pdns
gmysql-user=pdns
gmysql-password=PASSWORD
gmysql-dnssec=yes
At the moment you have a DNS server with default authoritative mode installed on port 53 which can only response to DNS requests it knows about, in other words, it doesn’t answer to queries such as google.com since it doesn’t have DNS forwarder.
Since we want this DNS server to be responsible for both modes. The forwarder mode needs to listen to port 53 rather than the authoritative one. We will change default port of authoritative DNS server to something else.
vim /etc/powerdns/pdns.confEdit followings:
local-address=127.0.0.1
local-port=5300
Restart PowerDNS
sudo systemctl restart pdnsMake sure PowerDNS listens to port 5300
sudo netstat -nlp | grep 5300Now installing PowerDNS recursor
sudo apt install pdns-recursorEdit recursor configs
sudo vim /etc/powerdns/recursor.confIn order to response to local request, there should be a domain name, in our example I will use example.com
forward-zones=example.com=127.0.01:5300
local-address=0.0.0.0
Also if you want to choose a specific external DNS forwarder you can config such as following :
forward-zones=example.com=127.0.01:5300,.=8.8.8.8And then restart the service
sudo systemctl restart pdns-recursornow you have a fully functional DNS server which can serve both local and forward requests. But how about managing it? there is a util ships with PowerDNS called pdnsutil but I am not going to use this, rather I will install a GUI based administrating tool called, powerdns-admin. For using this tool I will install it using docker-compose. All I need is powerdns-admin docker-compose file.
wget https://raw.githubusercontent.com/ngoduykhanh/PowerDNS-Admin/master/docker-compose.ymlMake sure you have installed docker and docker-compose on your system
I don’t want to use any local database for powerdns-admin so I will remove following line from downloaded docker-compose.yml
SQLALCHEMY_DATABASE_URI=mysql://pda:[email protected]/pdaIn this way the powerdns-admin will start using sqlite which is suffice for my setup. Then I will run the service with following command:
docker-compose up -dWhen we run this docker-compose file we can reach it from port 9191 via a browser. At first we need to create a user which is a straightforward task, then we can login to powerdns-admin using the created username/password. But powerdns-admin doesn’t work without API key and API url. We need to enable PowerDNS API and webserver first. These configs belong to authoritative component, edit following file :
sudo vim /etc/powerdns/pdns.confAdd following lines :
api=yes

api-key=YOURVERYSECRECTAPIKEY
webserver=yes


webserver-address=0.0.0.0

webserver-allow-from=0.0.0.0/0
Restart the pdns service again.
sudo systemctl restart pdnsSince we are using powerdns-admin in docker mode inside the PowerDNS server, it has to know IP address of PowerDNS internally. We can find docker ip using :
ip rWe are looking for docker IP address which in my case is 172.17.0.1, yours is going to be different. So make sure you’ve got your correct IP first.
Then we will get back to browser, Setting > PDNS
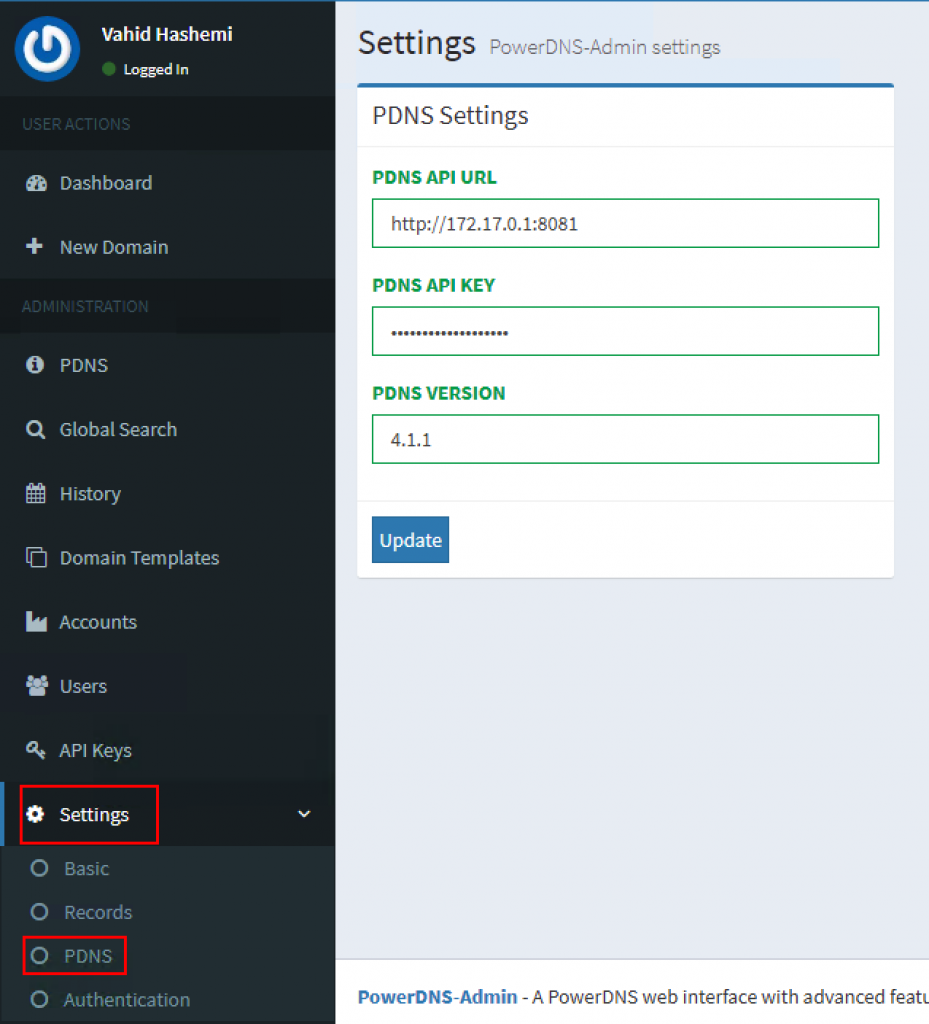
Add your IP address and the API key and done. Now you have a fully functional DNS server with a GUI administrating tool.
For Editing local DNS server you have to go to Dashboard and create the example.com over there and rest is easy.
Just remember don’t edit PowerDNS records directly from mysql unless you know what you are doing, otherwise you’ll get couple of errors and your DNS won’t work properly.
Also in this scenario I didn’t config firewall but you need to config a firewall and allow users only access to specific ports.

My chief interest is software engineering, mainly dealing with Linux and Java projects, but also interested in teaching what I’ve learned, have published a couple of CBTs about programming in Persian (java/Android) and here I’ll share my thoughts and experiences in English as well.